
Sunday 28 February 2010

| |||||||||||||||||||||||||||||||||||||||||||||||||||||||||||||||||||||||||||||||||||||||||||||||||||||||||||||||||||||||||||||||||||||||||||||||||||||||||||||||||||||||||||||||||||||||||||||||||||||||||||||||||||||||||||||||||||||||||||||||||||||||||||||||||||||||||||||||||||||||||||||||
Saturday 27 February 2010
Friday 26 February 2010
Maya Tutorial - Texturing and shading

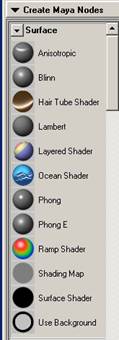
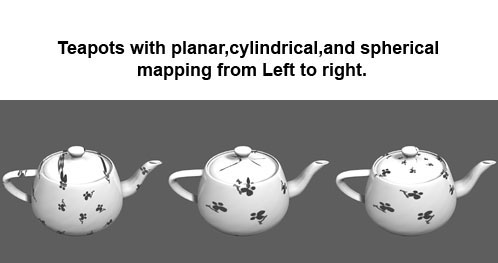
Color The default material color. If the transparency value is 0(black),the surface is totally opaque; if the transparency value is 1(white),the surface is totally transparent. If you change transparency from the default black ,the background of the material's hypershade swatch becomes a checked pattern .This is not a visual aid and is not rendered. Uses Black by default. As the ambient color becomes lighter, it affect's the material's color by lightening it and blending the two colors. The color and the brightness of light that a material appears to be emitting. The default color value is 0. Makes the surface appear more rough or bumpy by altering surface normals according to the intensity of the pixels in the bump map texture. A bump map does not actually alter the surface. Gives the material ability to reflect light in all directions. The diffuse value acts like a scaling factor applied to the color setting-the higher the diffuse value, the closer the actual surface is to the color setting. Gives the material the ability to transmit and diffuse light. Light falling on a translucent surface is first absorbed beneath the surface and then diffused in all directions. The slider range is 0 to 1. Surface Material Attributes The color of shiny highlights on the surface. A black specular color produces no surface highlights. The default color value is 0.5. Gives the surface the ability to reflect its surroundings or the reflected color. The default color value is 0.5. Represents the color of light reflected from the material. This can be used to tint a reflection. Fig 5-3 Surface Materials Represents surfaces with grooves, such as cd or feathers etc. Anisotropic material (such as Phong or Blinn)reflects specular light identically in all directions.If you spin an isotropic sphere, its specular highlight remains still. Determines the overall roughness of the surface. The range is 0.01 to 1.0.The default is 0.7.Smaller values correspond to smoother surfaces and the specular highlights are more concentrated. A fresnel is a flat lens consisting of a number of concentric rings that reduces spherical abnormalities. The Fresnel index for water is 1.33.Value range from 1.0 to 20.0. If on, Maya automatically calculates Reflectivity as a fraction of roughness. Reflectivity is on by default. Blinn Attributes Color The base color of the surface. Transparency Adjusts the surface opacity. You can use colors to create a tinted glass effect. Ambient Color Adds to and blends with the color value. Incandescence A simulation of emitted light. At low values, it tints and self-illuminates the material, and at high values, it overtakes the material's color and becomes self-illuminated. Diffuse By default, it's set to 0.8, which dulls down the color value you've set. Translucence A special effect in which light is absorbed and scattered as it passes through an object, useful for simulating materials such as frosted glass. Translucence Focus Controls how light scatters from the surface. Eccentricity The width of the highlight, simulating how polished or rough the surface appears. Specular Roll Off The brightness/intensity of the highlight. Specular Color The color of the highlight; usually set to white or a gray value. Reflectivity The strength of reflections on the object. Reflections can be raytraced or use texture maps. Reflected Color For Blinn, the color swatch and slider have no effect. However, when a texture map is applied, it appears to be reflected by the material. Lambert Represents matte surface(such as chalk,matte paint,unpolished surfaces) with no specular highlights. The initial shading group uses a lambert material. Layered Shader Attributes Represents a single surface material composed of several different surface materials layered on top of one another. Transparency By default the material is semi-transparent. Composites the layers using a layered shader or layered texture mode. Helps you distinguish the objects assigned to a layered shader in the views. Phong Attributes Represents glassy or glossy surfaces with a hard specular highlight. This feature is available to the phong material. Controls the size of shiny highlights on the surface. The default value is 20. Phong E Attributes A simpler version of the phong material. The specular highlights on the Phong E surfaces are softer than those on Phong Surfaces and Phong E surfaces render faster than Phong surfaces. Controls the specularity focus. Controls the amount of specular highlight. Controls the specular highlight color. The default value is white. You can also map a texture to this value. Shading Map Attributes Represents a color map you apply to surfaces after they are rendered.The shading map material is useful for creating non-photorealistic effects(cartoon shading)or to highlight threshold values in a rendered image. Defines the color of the material. The default is gray. You can map any material to the shading Map material. Surfaces Shader Attributes A wrapper node, meaning you can connect any keyable attribute to this shading group and then connect the shading group to an object. The color of the material .The default is black. The transparency of the material. The default is black. The glow color of the material. The default is black, without glow. Use Background You use it to set the object's Matte channel to 1 or 0, or create a matte for shadows and reflections on the surface. This material applies the same color as the objects in the background image to stand -in-surfaces. Adjust the Use Background material's to the light ,shadows, reflections and the geometry placement in the scene. Texture Mapping Normally, a texture refers to applying a 2D image around a 3D surface, rather like wallpapering a curvy surface. Because a 2D image can be stretched, wrapped, and projected onto a surface in many different ways. Mapping coordinates, also known as UV coordinates. For NURBS, parametric mapping is inherent to the surface and this is typically what's used. Parametric mapping is the 0 to 1 coordinate system that NURBS uses to map textures across its surfaces. It makes sure that the textures stay mapped to the surface like a decal, even if the geometry is deformed. For polygon surfaces, mapping is normally applied by projecting 2D maps across the 3D surface in one of several ways: planar, cylindrical, spherical, and a special method called automatic mapping. Fig 5-4 Mapping projection Procedural Maps In addition to applying an image or movie to a surface, Maya has other texture types called procedural textures. Many patterns, such as bricks, tiles, and gradients, are so repetitive that they can easily be represented by an equation. By using special forms of seemingly random values, many natural effects can be simulated mathematically: Marble, leather, water, granite, and many other complex and random textures are included with Maya as procedurals. Maya's procedural textures come in two varieties: 2D and 3D. You can think of the 2D procedurals as a calculated form of a bitmap.When 3D procedurals are applied, however, they exist throughout 3D space, and object surfaces define where you see the texture. It's like carving the object from a block of the material.Procedural textures have several benefits. Because they are formula based, their parameters can be adjusted to instantly synthesize all kinds of different effects. Maya's 2D procedurals can be divided into two categories: regular patterns and noise patterns. The regular patterns include Grid, Checker, Bulge, Cloth, and Ramp. With these patterns, you can create tiles, bricks, and many other man-made repeating effects. Noise patterns include Fractal, Mountain, Noise, and Water. These psuedorandom textures are excellent for creating the complex "dirty" surfaces common in nature. All the 3D procedurals but snow are random types. Some, such as wood and marble, clearly imitate nature. However, all are excellent for synthesizing random effects. Assigning material to surfaces The following lists a few quick ways to assign a material to a surface. or or Transparency
Ambient Color
Incandescence
Bump Mapping
Diffuse
Translucence
Specular color
Reflectivity
Reflected color
Surface Material
Anisotropic
Roughness
Fresnel Index
Anisotropic Reflectivity
Compositing Flag
Hardware color
Cosine power
Roughness
Highlight Size
Whiteness
Shading Map Color
Shader
Out color
Out Transparency
Out Glow Color
Attributes
Mapping Coordinates
2D Procedurals
3D Procedurals
To apply a material to several surfaces from with Hypershade
To apply a material to a group of faces on a polygonal surface
Press the RMB while over the surface,select face from the marking menu,then choose the select by component type icon.While the faces are highlighted in the view, in hypershade,LMB-shift-click over the material swatch you want and press theRMB and select Assign material to selection from the pop-up menu. http://images.google.co.uk/imgres?imgurl=http://www.expertrating.com/courseware/mayacourse/MAYA-Texturing-Shading-1_clip_image002.jpg&imgrefurl=http://www.expertrating.com/courseware/mayacourse/MAYA-Texturing-Shading-1.asp&usg=__Jy5O2eUSQB4ln3EiNa0cqO5RBcM=&h=525&w=568&sz=28&hl=en&start=69&um=1&itbs=1&tbnid=I91l48HL3n9YiM:&tbnh=124&tbnw=134&prev=/images%3Fq%3Dadvanced%2Bmaya%2Btexturing%2Band%2Blighting%26start%3D63%26um%3D1%26hl%3Den%26lr%3D%26sa%3DN%26ndsp%3D21%26tbs%3Disch:1
Tuesday 23 February 2010
where am I - update
OK....starting to feel a little nervous with getting this project done. I'm a week behind so got lots to do.
Things i have left to do.
Tracking
Animating
lighting
Achieved
modeling bike
some lighting
tracking lighting wall for bike
storyboard concepts
editing movie
chosen movie clip
research
timeline
brief
If I had to do this project again I would defenatly finish modeling earlier and spend more time on tracking and lighting. Hey...but lets not forget lost two weeks at the beginning with snow!!!
good tip from Alex - Lighting


Made it worth while going in today just spending 10 Min's with Alex..........Alex showed me How I could get the window parallel to mirror on the other side. Problem I had was if I duplicated and rotated the shape wouldn't be right. what I needed was to duplicate the shape and some how blow it out so that the convexed shape was also convexed on the other side......if that kinda makes sense....anyway....the simple answer was to duplicate the shape move to where I wanted and on the x axis put a minus and that makes a concave into a convexed! Nice one Alex it's these things that really help.
Also By adding the light strip as the model moves - select c.v curve tool - straight line - duplicate - surfaces - Loft remembering to deselect the object...remember to label in the channel box. up arrow selects all the objects - make sure you select this when moving........I applied shader Incandescence in blue - made two torus scaled it down for the wheels.......pretty cool........
Really appreciate the advice..
update
Update with blog editing movie. Maya live etc talk about how difficult I found finding a footage and time wasted
film footage
Tron
o Tron is an 1982 American action science fiction film by Walt Disney Pictures.
o Written and directed by Steven Lisberger.
o Visual style – inside the electronic world – Clu – first film from a major Studio to use computer graphics extensively
o A software engineer works for the software corporation ENCOM creating video games on the company’s mainfrome after hours aiming to start his own gaming company. Another software programmer locks him out of the system. And presents Flynn's work as his own.
o Inspiration for TRON occurred in 1976 when Steve Lisberger looked at a sample reel from a computer firm called MAGI and saw Pong for the first time. Foundation of bringing video games and computer visuals to the screen.
o Film was conceived to be predominately an animated film with live action sequences. The rest would involve a combination of computer generated visuals and back lit-animation.
o Artists that created the look of the computer world. French comic book artist – Jean Giraud – main set and costume designer. Vehicles designed were created by industrial designer Syd Mead of Blade Runner. Peter Lioyd a high tech commercial artist designed the environments.
o Although only fifteen to 20 mins of actual animation were used mostly scenes that used the light cycles, tank and ships. As the technology to combine computer animation and live action did not exist at the time these sequences were intercut with the filmed characters.
o Most of the scenes, backgrounds and visual effects in the film were created using more traditional techniques and a unique process known as ‘backlit’ animation. – live action scenes inside the computer world were filmed in black and white on an entirely black set printed on large format high contrast then colorized with photographic and rotoscopic techniques to give a technological feel.
o Light Cycles – Created by Syd Mead fictional vehicles simulated the Tron Universe. These futuristic vehicles resemble motorcycles and create walls of coloured light. They were originally used in competition with humanoid computer programs. Players are in constant motion on a play field creating a wall of light behind them as they move.
o I will be creating the tron bike in Maya and simulating the wall of light by parenting strip to the bike using cv curves lofting and objects. This is enabling the bike to produce a fluorescent strip of colour (which I will use in the hyper shade) as the bike moves along.
The bike is model in these components
o Wheels – Front and back to include fluorescent ring
o Main body
o Extension to body flat panel x2
o Convexed windows x2
o Jets x2
o And detailing
story board renewed concept


This is the clip i will be using from mad max 1./Users/depamasih/Desktop/TERM 2/Industryexercise/tronscene.mov
Review - Changes in concept
To take a live action movie - ' MAD MAX 1' and model the bike from Tron to ride along a long strip of road. The scene that I am putting the 3D bike has a still camera original bike in scene zooms towards the camera. this footage will be replaced with the 3D tron bike I modeled in Maya. I will change the lighting so it is dark. The animation will be about 30 seconds long. I will model texture and animate the props to create a short sequence mixing live action with Maya derived animation.
The schedule has changed somewhat as i have spent so much of my time trying to find the right scene......I browsed through endless films from originally Kubrick to Matrix, speed, Munich, Gataca, Equilibrium and many more......Just put it down to not feeling it perhaps...It's only when Josh mentioned have you looked at Mad Max....Cool thing is max has lots of road footage that would probably work......Cheers Josh for recommendation.....
I am really behind on the Schedule as most of my time partly because I don't know what I'm doing with this one has been spent on the Environments project. I've finished modeling bike and need to edit clip and Track sequence I'm hoping I can do that tomorrow.......A little stressed I'm not gonna get it done as time is running out.....
Schedule
Week 1 - Snow
Week 2 - More snow
Week 3 - Story Board and concepts
Week 4 - Model
Week 5 - Model and Track Tutorial
Week 6 - Model and Lighting Tutorial
Week 7 - Texture/Lighting
Week 8 - Render and compositing
Basically a week behind schedule I'm hoping to make this back this week.


Wednesday 10 February 2010
Modelling bike
 Constructing other wheel. The only thing is duplicating back wheel to move to front and scaling it in adjust the sphere inserted in the centre of wheel. As the wheel is compressed/slimmer so to the sphere. so it does not protrude same as the back wheel. unfortunately I have merged shapes so not sure how to get out of this one. Will have to ask Steve when I'm in today.
Modelling tron bike


 Started by image plane. Model wheels by creating a nurbs sphere, scaling, rotate so vertices are set to side profile so faces can be removed. used tools such as fill hole, add edge loop, to bevel the edge slightly.....
Tuesday 9 February 2010

Wednesday 3 February 2010
Alternative Brief

To take a live action movie - ' Space Oddessey 2001' and model the bike from Tron to ride around the ape scene in the beginning of 2001. The bike will ride around props that will be a tribute Kubrick films such as the axe in The Shining, the helmet that displays born to kill from full metal jacket, bowler hat from clockwork. The props will interact with the scene for example the axe will be animated by being thrown at the obelisk and the obelisk splitting just like the scene where Jack Nicholson breaks down the bathroom door with the axe. The animation will be about 30 seconds long. I will model texture and animate the props to create a short sequence mixing live action with Maya derived animation.
Schedule
Week 1 - Snow
Week 2 - More snow
Week 3 - Story Board and concepts
Week 4 - Model
Week 5 - Model and Track Tutorial
Week 6 - Model and Lighting Tutorial
Week 7 - Texture/Lighting
Week 8 - Render and compositing
My Brief
Project Brief
This unit builds directly on the Industry Exercises 1 unit, allowing students to broaden their range of professional animation skills or to develop existing areas to an advanced level. Students also develop more advanced planning and organizational skills essential in the delivery of a completed project within a fixed schedule.
Students will complete two projects in this unit, one can be self initiated (negotiated with tutor) or students may choose to revisit an exercise, which was not developed fully in the Industry Exercises 1 unit. The second project is an explicit production schedule for the term, that demonstrates competent use of scheduling software to model potential outcomes. Student projects must have a clear focus on the development of industry relevant skills, their overall artistic or creative style, and contribute significantly to the demonstration of their employability in their final show reel.
These practical exercises are supplemented by a reflective commentary.
11. Aims of the Unit
• To enable students to supplement possible career specialism’s within the animation industry through the development of ancillary skills.
• To enable students to further develop portfolios of work demonstrating advanced proficiency in the specialism of their choice.
• To provide experience of establishing and developing personal project schedules and tracking progress towards project completion.
• To further develop critical awareness within the students of their personal skills, and the ability to generate research strategies for continuing enhancement.
Project Brief:
For this project we will be building on your existing animation and compositing skills. You will be introduced to Maya Matchmove camera techniques, lighting, advanced UV editing and modeling and have opportunities to improve your rigging and animation skills. To make it all manageable you will first be introduced to project management and tracking software.
You will be working to create a short sequence mixing live action with Maya derived animation or props and buildings.
There are two aims for this project: first to enable you to plan and execute a project in a productive manner, thus enabling you to make the most of the time constraints on this and all future projects. The second is to improve your animation and modeling skills and enable you to show those skills off in an engaging and entertaining way.
Subscribe to:
Posts (Atom)